Showing posts with label scrapbooking. Show all posts

Tuesday, January 06, 2015

Saving Photo Christmas Cards

I love the photo Christmas (and New Year) cards so many people send out this time of year. And while I have no trouble tossing the generic winter- or manger-scene cards in the recycling bin at the end of the season, I like to save the photo cards that so encapsulate the year and changing lives of friends and family. For the past seven years, I've saved those cards as part of my Christmas scrapbooking, showcasing them alongside our own family Christmas card for the year.

I've done it in several ways, so allow me to share a few possibilities!

The first couple times, I simply made a collage-type scrapbook page using the photos from some of the photo cards we received—not all, I don't think, though it's probably most of them, since photo cards weren't quite as common in the mid-oughts as they are now :0)


Another approach is to build a pocket into the scrapbook page. Our card and a headline are front and center, but a pasted-in pocket (an actual envelope, in one case) holds all the other photo cards, accessible through the top of the page protector.


A new approach was in order once we started doing two-sided cards on nice cardstock. For the past few years then, I've done a separate page protector (cut down to size and sealed) for our family's card, so that front and back can be viewed easily.  The other cards are in a page protector of their own with tie closure embellishment (string between two brads) to keep it closed.


Last year, I made the pockets for all and for ours out of the same page protector, running it through the sewing machine to seal off our card at the bottom and doing the tie-closure again at the top. The downside of that design is that only one friend/family card is very visible on the front and one on the back, because the pocket is so small. Typically, I like to flare the cards out some, with favorites near the top so I can see several even without opening the pocket.


This year, I was less crafty about it and just purchased a pack of Project Life envelope pages. I added a little embellishment at the top, but otherwise let the nice plastic envelope do its job. It has a nice 4x6 pocket on the front for a journaling card to explain the envelope's contents, but I left it empty to let the cards inside speak for themselves. (And I look forward to using the other two envelopes in the pack for Kate's schoolwork and other big items to save!)


I made a simple cut-down page protector for our own card.

I love looking back at our own family's cards through the years, and last year I crafted a decoration to let me and any guests to our home see the progression of our family through those cards, from our marriage to pregnancy, one child to two, and so on. Burlap, a wide sparkly ribbon, and a bunch of paper clips with scraps of ribbon on each one were all it took.

I hope these ideas prompt you to get creative in saving those photo cards from family and friends, and in the words of our card this year, we are WISHING YOU PEACE, LOVE, AND JOY this season and always.

Thursday, November 06, 2014

Project Life: June and July

I'm in a quandry: I need (and want!) to share all about Claire's birthday party from going-on two weeks ago, especially since a dear friend took tons of photos of the party FOR me, which was such a gift. But, I only have five minutes, and since said friend also mentioned how much she loves my scrapbooking posts, I won't feel too bad about sharing some scrapbook pages instead. (Especially since I only catch every other monthly Project Life linkup with The Mom Creative, and she missed last month herself, I better take advantage of the linky motivation :0)

Soooo . . . here's my June and July!

The week of Memorial Day, we had our little vacation-staycation, including some fun at-home things like swimming, the zoo, and a baseball game, plus three days at Wilderness at the Smokies.


In June, I finally got to use some fun boyish papers I'd had in my stash for a while for a traditional 12 x 12 page. Our brother- and sister-in-law came to visit, and we got some sweet pics with our nephews and of the girls with their cousins. They are more private about social media stuff than we are, so I'll just share a little snip of the page. It was too cute.

And Matt's parents took the kids to a Frozen-themed event, which made for a fun "Let It Go" page, another 12 x 12. Sometimes, if I don't have the embellishments or fancy paper the page seems to need, I'll just paint the paper. They're not the best swirls ever, but they fit the bill to round out the page.
 Some more summer fun made for a mashup page with just a pic or two for each event.
 I love embellishing my month divider cards with extra papers and photos. I used packing tape to "laminate" this whole card-photo combo to keep it all together.
 Gotta get those extra words and pics in wherever you can!
I really love the Becky Higgins Design F pages, with just one 4 x 6 and a bunch of 3 x 4 slots. You can make such a montage of photos from one event, and all these red, white, and blue pics from our Fourth of July were perfect.
Also in July were a few things about Kate making the transition from preschool to kindergarten, but maybe I'll share all that in a school-themed post soon. Have a great day!

Thursday, June 19, 2014

Scrapbooking before Kids #TBT

I love to look through my scrapbooks—usually, the more recent ones of our family adventures in the last couple years, seeing how much the kids have grown and changed, etc. But recently I picked an older book off the shelf, and I just marveled at all the fun pages I made back before I had kids!

It's not just that most of our ordinary life and fun events involve the kids now (so of course they feature in most scrapbook pages) but I was also forced to get more creative to even find things to scrapbook. See, it's not just about the events getting documented, but the joy of the craft. When I got/get the urge to scrapbook, I'll find things to scrap about. And, of course, I had more free time to spend hours on a page, cutting out tiny embellishments, stamping out the lettering, etc.

2003: I did a whole two-page spread on the church I went to my last two years of college. (This was my stint in the Episcopal church, discovered through the guy I dated my junior year. I kept going and got even more involved after we broke up—and still went out to lunch with his mom sometimes!)


2007: I used a couple pics of Matt and I enjoying cocktails before a friend's wedding to make a page devoted to a "Friends" quote! (Chandler's boss says "There's no I in team," and Chandler quips, "but there are two in martini, so meet me at the bar!)

and like an elderly shut-in with only the weather to talk about, I did a page about the crazy heat that summer! (I tried to fry an egg on the blacktop. It didn't work.)

2008:  The author of the first book I edited was profiled in the paper (with a sidebar about the book) so i scrapped that, of course. The page protector is cut such that you can actually fold out and read the whole article. Opposite that, I did a page devoted to the beloved rabbit I had my senior year of college.

Actually, I did fancy pages about a lot of the special people and creatures in my life. Here's one all about Charlotte, our "first child," so to speak. She was a gift from Matt for Christmas 2004, so she's almost ten years old now. These pics were from around 2006-7, probably, and they were the most recent I could find when I had to make her "Lost Cat" posters in fall 2011. Sad!
I did a lovey-dovey page about Matt in 2007 too. Like the cat, Mommy and Daddy don't get a lot of photo love after kids, either. 

My dad got some scrapbook love in 2007 when I did a spread about his stint as Kentucky State Parks Commissioner. 

 Sometimes, scrapping was a way to preserve and highlight old photos I had sitting around. These on a page I titled "Pretty Mommy" were of my mom from 1970-71. Love it.

And I honored my grandmother, whose name was passed on from her mother (in center photo) and great-grandmother and is part of Kate's name as well.

I did pages all about our homes in our first years of marriage: the duplex where we first lived, complete with paint samples to show the color scheme of each room!

 And the parsonage we lived in from 2007-2011, including not only a sketch of the floor plan, but a flip book of the floor plans of the duplex and Matt's and my apartments in Nashville during our single days.

Finally, the scrapbook page that changed it all. . . yes, I surprised Matt with the news of our first pregnancy via a scrapbook page. The photos and journaling of Matt's reaction were added later, of course, but I actually did have the sticks there on the page when I opened the book and said, "Check out the scrapbook page I did while you were gone!"

Our lives—and my scrapbooks—would never be the same.

This post is linked up with The Mom Creative's "Throwback Thursday Stories" #TBTstories.

Tuesday, June 03, 2014

Project Life Monthly: April-May

We took a "vacation/staycation" last week, so in addition to a few days away, we enjoyed lots of fun downtime at home—which meant I got to do a lot of scrapbooking, which was so nice. I did my April and May layouts, though our adventures from last week are still forthcoming, of course. (I just uploaded the pics and will share those soon!)


 I did several "traditional" layouts in addition to the Project Life divided pages, including the one above I titled "Springtime Sweeties," with those cute coordinating polka-dot and umbrella papers I've had in my stash for a while.

Below, a few pictures of our kitchen remodel, as we went from peeling white thermofoil and blistering formica to wood and granite. My mom (who really needs to get a job at Home Depot, or as a quality-control inspector for a home builder) project-managed the thing for me, so I included a couple pics of the fun we had while she was in town helping out—Chuck-e-Cheese and the Muppet movie!
 For Easter, I used a 3-3x3 page between two bigger pages to accommodate all the pictures

After Easter, I had a couple pages of other fun stuff we did in April. (I tilted the camera to crop BGC's face out, but both those pics are so cute, I wish I could share. She's getting more of a personality all the time!)
 And the girls loved getting their faces painted at the Main Street Festival in Franklin.
 Then there was May—the first Saturday in May, to be specific! That is, Derby Day. One divided page for a few pics and other little scraps—a brunch ticket, the card of the restaurant Matt and I ate at on our Oaks night date, and a page from the racing guide. I embellished the month card with a Derby ticket on one side and a bit about what the girls did that day on the other.

Two of the traditional pages I did were for Derby (above) and Kate's pre-k graduation (below). Like Easter, I added a 3-3x3 page to the graduation stuff, to include more pictures and the text of the little poem the kids read during the ceremony.
One of the page protectors I used has a long vertical strip, so I gave Kate a strip of paper and asked her to write whatever she wanted, so I could have a good sample of what her handwriting was like as she finished pre-K. She chose to write her own name and the names of the other girls in her class.

I hope you have a hobby that gives you a stress release and creative fulfillment. I love how scrapbooking gives me a creative outlet and creates something special for our family to treasure for years to come.
For more Project Life posts, check out the link-up on The Mom Creative.

Tuesday, April 01, 2014

Project Life Monthly (Jan-Feb-Mar)

The last time I blogged about scrapbooking, I mentioned how I've missed doing traditional 12 x 12 pages with all the papers and embellishments, but using the divided page protectors made popular by Project Life and other scrapbooking designers is just such an easy and efficient way to get precious pictures into an album with some journaling and a little flair. So, I try to work in "traditional" crafty elements when I can, alongside and even in the Project Life divided pages. I'm taking the "hybrid scrapbooking" thing up a notch this year with more inserts and  embellishments, getting more creative when I can while keeping it super-simple when I need to.

Rather than using a photo slot for my month label card, like I have the past two years that I've been doing things month-by-month, this year I used 4 x 6 cards (from the Kraft core kit), stamped them for each month, and punched holes so they could go directly in the album as dividers. I think they have kind of a funky, vintage-library feel.


 As usual, my album for the year begins with Kate's birthday. I used some of the silver doilies from the party decor ("Winter Wonderland") to embellish the pages, especially since this is the first thing you see when opening the album.

I did a tall 6 x 12 page to feature the invitation, pictures, and some journaling at the beginning of the birthday spreads.
Since this party was more "scheduled" with activities and such than previous kids' parties I've thrown, I included a card with the timeline I had planned for everything (which actually was about how long everything took!)

Our other January activities included outings to the Nashville Children's Theatre and the circus, both with our friends the Pauls. Kate and Natalie had such a fun time at both events!
And, the day after Kate's party, Matt and I took off for a ministry conference in Phoenix, so I have a nice page of pics from our little midwinter time in the sunny desert! I saved the light rail pass and our hotel key card, since they were unique and fun, adding some neat tokens to the page. I wish I'd done the writing on the photo a little nicer, but I do think it's a fun way to get the journaling in with a photo. In fact, I took that pic of the palm trees with plenty of sky space specifically for that purpose! (PS: if you're going to Phoenix, the Clarendon Hotel was very cool, as you can see! The pool courtyard looked like a place Don Draper would have stayed on his Season 2 excursion to California!)
These 8 x 6 cards came with a smaller album I bought, and they are nice for a little mini insert. This one has Kate's writing and sticker-placement, along with a photo and story about a visit to the pulmonologist to investigate Kate's chronic cough (no real answer--it's "asthma-like" but not asthma).
And on the other side, a little page to talk about the girls' love of matching--one another and even me, when they can. I loved finding those leopard-print shoes for Kate since they matches ones I already had!

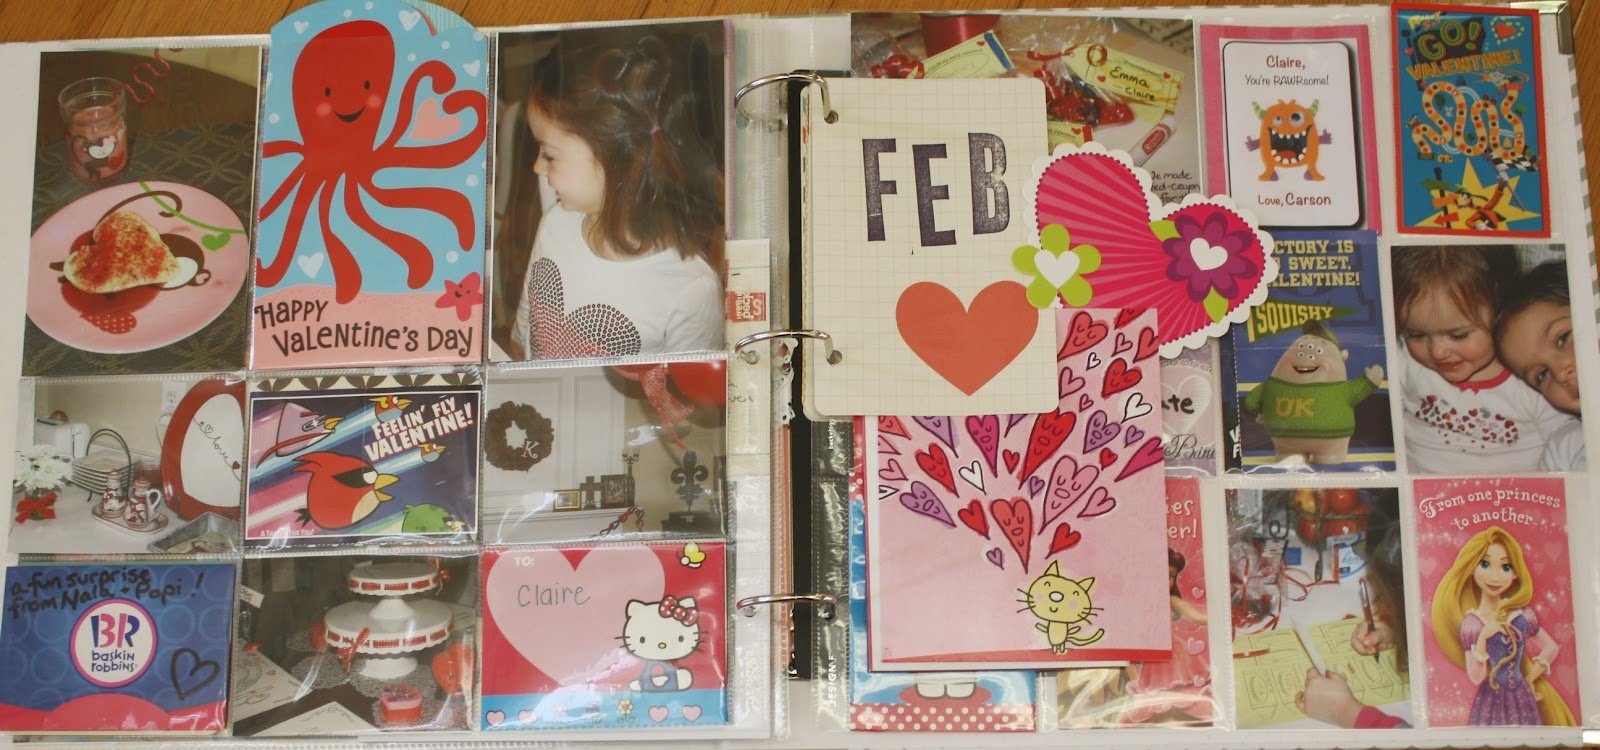
For February, I had so many Valentine cards and whatnot I wanted to work in, I started adding on to the month-divider card, making it an eclectic insert in its own right!

I always include pics of our decorations and the Valentines the girls make and give out, but I love saving some of the store-bought ones they get, too, as a sort of time capsule as to what kids were into in a given year. Obviously, Hello Kitty, Monsters University, and Tangled were big this year. (I guess Disney didn't make a licensing deal for Frozen valentines fast enough for this year!)
I got a small start on March's pages over the weekend, so here's a quick glance (hasty cell phone pic!) at my St. Patrick's Day pics, alongside some fingerprint clover art the girls did and again an embellished month-card to share some clover Claire colored in school and Kate's memorable quote of the night.
I haven't had much time for getting crafty lately, but it always feels good to throw even a little page together!

LinkWithin

Blog Widget by LinkWithin